 by
by The setup of your guitar (pt 2): let's adjust the truss road
Evaluation of relief and neck
adjustment in electric and acoustic guitars.
In this
article you will find technical information and practical tips about the
adjustment of the guitar neck
truss-rod.
It is
advisable you have read and understood the article about necks and truss-rods
What is the truss-rod? also published on this blog.

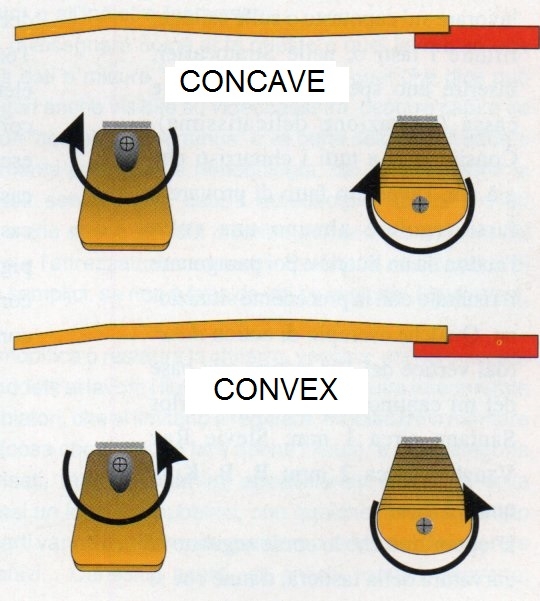
From top to bottom: convex, straight and concave neck.
Neck adjustment: checking the relief
Assuming for
sure that you have read the above mentioned article
What is the truss-rod? where neck and truss-rod typologies are described, let's see in
practice.
Let's assume
we have been owning the guitar that has to be set since some time; that the
guitar is equipped with our usual gauge
string set and it has a good general setup that allows us to play. This also
applies to a new instrument we were able to personally test before purchase or
an online bought instrument that features builder's or
retailer's warranty of a good factory setup.
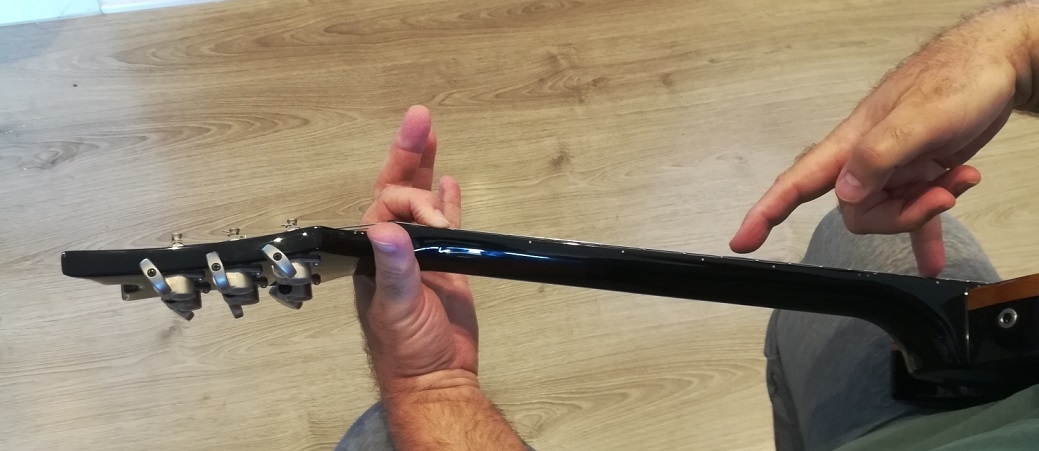
As the first
step, we have to verify if the neck is
straight enough. Let's press our
left index on the low E string at the first fret after the nut, and the right
little finger on the first fret out of the guitar body, usually the 16th or
17th on electric guitars, 14th or 12th on acoustic ones. We are practically using
the E string as a rule between due frets far from each other on the fretboard.
Let's hold steady the string pressing fingers and use the right index or thumb
to try out the
distance between the string and the frets top, called relief,
in the neck portion around the 7th-8th fret. We can repeat this operation for
smaller portions, moving the pressed points to look at limited parts of the
neck.
If we push the
right index at the center of the observed string portion, we will feel it
tapping slightly on the frets, by example between the 5th and the 9th ones; so
we will be able to evaluate if the neck in that area is straight or bowed, in
the sense of concave. In case the neck is convex, that is backwards curved, we
will not feel the string hitting the frets, but most likely resting on all or
almost the frets we are observing. Actually, in case the neck is convex, we
should be able to notice the flaw without doing any test at all. We should have
suffered problems just playing the guitar, such as fretboard
buzzing, lack
of intonation
, even blockage of strings on frets. In these extreme cases it
is advisable to turn to our trusted luthier, though we have read in the article
What is the truss-rod? that double action truss-rods can fix backwards bowed necks too.

A second step
you can do – but this requests a trained eye and experience – is observing the
neck as if you were pointing a gun, both from the headstock to base and the
contrary. If warping is considerable, you will see the fret line
not
following a straight line
, instead bowing in one way or another under the
strings. Sometimes the bend can be unpleasantly irregular and affect just a
portion of the neck or just one side, in this case indicating a suspected
longitudinal twist: bad business indeed, and you'll have to turn to your
trusted luthier.
Are there reliable specs?
We could start
now a gigantic series of considerations and suggest several rules about the
height we should feel between the low E string and the top of the frets. Every
manufacturer has its measures, or
specifications, described in the
specialized literature for every guitar and variable according to models and
lines of instruments, sometimes according to production period too. Decades ago
Fender or Gibson specs could be stricter than what the same companies claim
today for similar instruments and replicas made with more economic criteria.
If we move on
to
luthiers, a skilled craftsman usually has his own stricter specs,
tailored on the basis of his ability in guitar making and
customer requests.
Just to give
you few numbers, Strat and Telly manufacturer specifies a variable relief of
0,3 to 0,25 mm according to the
fretboard radius (7”1/4 or 9”1/2), measured at the 8th fret with the low E string pressed as above
described.
The importance of an excellent fretboard
By and large,
the higher the grade of an instrument, the more precise should be its
fretboard
finishing
. Computer controlled machines are often used today (CNC: Computerized
Numerical Control
), thus permitting to get nearly perfect fretboards in a
few minutes, according to machinery accuracy and
software refinement.
When instruments are built by thousands per month, time has its importance and
cost, but new construction techniques give life to better and
better guitars
in the budget range too.
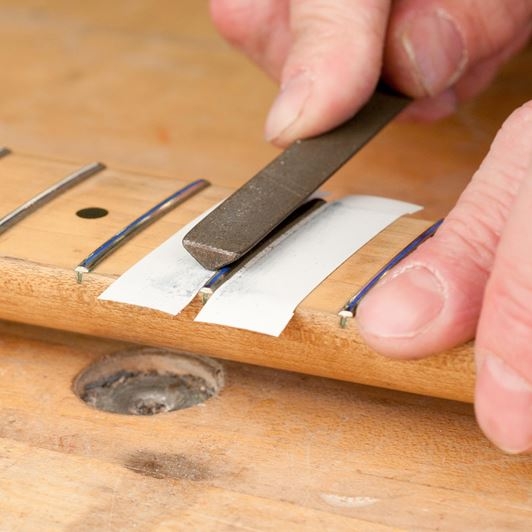
Before giving
some general tips, you'd better know that a low height of strings over the fretboard
does not depend on the truss-rod and our adjustment capability only, but mostly
on
frets placement and finishing. When a neck is set very straight with
very low strings, it is not rare that buzzing becomes noticeable because of not
perfectly layed and finished frets. In these cases it is advisable to get back
to a state that the instrument can accept or turn to a luthier and get an
intervention of no small account called
dressing.
That is not
all: in fact neck setting is only a part of the more articulated adjustment of
guitar
action. This operation also involve working on the bridge, the saddles
and eventually the nut. We are back to this topic in a specific article also
issued on the
Soundsation blog. So far, let's just make our guitar neck reasonably
straight
.
Straight neck, OK; but how much straight?
Some
experienced luthiers think that the neck must be
perfectly straight, or
almost perfectly straight. Consequently the distance (relief) of the string
pressed by the right index and the middle frets of the neck should be
near
to zero
, almost imperceptible. Between ourselves, sometimes luthiers state
that to show us how good they are... Anyway this is possible only if the
fretboard is perfect and all the above mentioned action adjustments have been
done professionally.
Remember that
this article only purpose is the adjustment of the relative straightness of the
neck, not getting a perfect instrument. When you make your personal setup,
refer to the
suggested specifications on handbooks and
manufacturers' websites, Please consider that:
- a straighter neck, with minimum relief, makes comping, jazz and virtuoso
rock solos, chord melody easier to play; moreover, our fingertips pressure will
be light and will not cause subtly
out of tune notes
- a neck with a certain relief, therefore slightly curved, makes easier to
play rock and blues classic techniques, as the
bending. Strings vibrate
more freely and the instrument sound will be somewhat better. A higher
fingertips
pressure
is needed to press the strings, possibly generating few hertz
dissonance in played notes.
It's time to adjust the truss-rod!
So many
premises just to arrive at a simple operation: turning
clockwise or
anti-clockwise
the moving nut of the truss-rod! Once the straightness has
been verified, if the relief is too pronounced and the neck appears too
concave,
tighten the truss-rod turning the nut or the rod head clockwise,
as if it were a screw. If the relief is poor and the neck seems too
straight or even convexity prone,
loosen the truss-rod turning it anti-clockwise.
If you are
working on a vintage Stratocaster style guitar with truss-rod access at the
neck base, you must in the order: completely loosen the strings, undo the heel
screws and lift the neck, adjust the truss-rod guessing the resulting effect,
reassemble the neck and tune the strings. In case it is needed, you have to
loosen, unscrew, lift, adjust and reassemble again: good luck! (Leo Fender did
not like the idea that musicians adjusted themselves the neck). Experience or a
luthier's work will help not to repeat this operation too many times.
Once the
adjustment has been done, if you look at the neck from the headstock towards
the base, you will see it magically adapting to our corrections. In case, it is
possible to help a little by means of a
slight pressure of the hands in
the adjusting sense. Attention, most times
little adjustments of one
quarter of turn or less are enough. Always start from a
slight opposite
rotation
before going on in the desired direction.
The described
process applies to both
electric guitars and acoustic guitars, to adjusting access points at the neck base and behind the nut. And to
electric basses as well!
Attention: if
the truss-rod is blocked or hard to adjust,
do not pick it! Stop instead
and turn to the luthier's help.
Once you have
checked the effects of the adjustment from the neck ends, press again the low E
string with your fingers pushing at the first fret and last fret out of the
body. Then play as usual what you usually like, and try to understand if things
are better or worse from a performance point of view. Check if there are no
buzzes, if bendings are not hampered, if the sound is solid and the sustain
is adequate.
The truss-rod
adjustment has to be made
by trial and error, until you get an
acceptable result. You can further verify
string height compliance to
manufacturer specs using a caliper or a feeler gauge
, but always remember
that neck adjustment is not the only needed operation. Also remember that your
trusted luthier is always ready to welcome you if you don't get over it. After
having read this article, you will better understand what he is going to do to
your guitar.
In this
article we have dealt with the truss-rod adjustment, a key step on the way to
guitar
general action adjustment
. We talk about this topic in an appropriate
article you can find on the Soundsation blog!
Fabrizio Dadò
References
Dan
Erlewine:
Guitar Player Repair Guide, 2nd Edition (Miller
Freeman Books, 1994)


@ Frenexport Spa
62017 Porto Recanati (MC), Italy